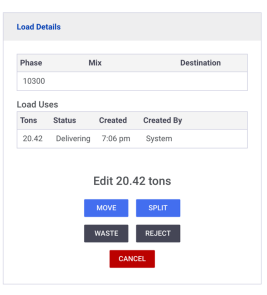
Overview
Administrators and project managers can modify a load’s details. The four modifying options include: Move, Split, Reject, and Waste.
Note: Changes to a load are unavailable after the load was unloaded.
Navigate to load details
To access load details, navigate to the current job by clicking the “View” button. Then, go to the delivering view and click on the load you wish to edit. Scroll down to the load details box and click “Edit.”
Move Load
The “Move Load” option allows you to transfer the current load to a new job or destination. You need to enter three pieces of information: the new phase for the load, the new load destination, and the reason for the move.
Split Load
If you need to divide a load for two different purposes, select the “Split Load” option. Use the slider to specify how the load should be divided. Additionally, provide a reason for the split.

Reject Load
By choosing the “Reject Load” option, you can send back a load or a portion of it, which will be deducted from the job’s net weight. A flag is added to the load to easily identify rejected loads in reports. You can provide notes to explain the reason for rejection. The E-Ticket will display the load as rejected and include the rejection note.
Waste Load
If a load or part of it was not used, click the “Waste” button. This removes the load from the net weight calculation. Load details will indicate that the load was wasted. The E-Ticket will display the load as wasted and provide a reason if it was provided.


